

By Dale Putman
When it comes to production drilling and setting poles, electrical utilities and utility contractors must often make decisions on site about the best equipment and tool for the job. Boring reports provide some insight into the geological makeup of the ground, but the reality is that the conditions can vary dramatically between locations that are just a few feet apart.
For this reason, utility crews often rely on two important pieces of equipment, digger derricks and auger drills also known as pressure diggers. While the equipment performs similar tasks, they are best used in combination due to the different grounds.
Auger drills deliver more than double the torque over digger derricks, making it possible for them to achieve more downforce on auger tools. Generally speaking, auger drills are capable of 30,000 to 80,000 ft-lbs, and 200,000 ft-lbs on European drill rigs, while digger derricks have 12,000 to 14,000 ft-lbs of torque. That makes auger drills more suitable for drilling through harder material and for creating larger and deeper holes, up to 6 feet in diameter and 95 feet deep. While digger derricks are used for drilling, they may be limited to softer ground conditions and holes with smaller diameter and less depth. Typically, digger derricks can drill to 10 feet deep at diameters up to 42 inches. With pole handling capabilities, digger derricks are ideal to follow behind auger drills, setting poles in the holes prepared by the auger drills.
For example, a job that requires a 20-foot deep hole with 36-inch diameter is better suited to be performed by an auger drill because of the depth required. If the same size hole only needs to be 10 feet deep, then a digger derrick may be suitable to perform the job.
CHOOSING THE RIGHT TOOL
Equally important to selecting the right machine for the job is selecting the right auger tool. Tools with a hex coupler attachment are used by digger derricks, while those with a square box coupler are used by auger drills. Tools are not specific to the OEM, but that doesn’t mean that all tools are created equal. Terex is the only manufacturer of digger derricks and auger drills that also manufactures tooling, providing auger tooling designed for maximum productivity and efficiency. When choosing the right tool for the job, selection factors include auger style tools or barrel tools, various types of teeth, pilot bits, and multiple tool sizes.
You can drill dirt with a rock auger or barrel tool, but you can’t cut rock efficiently with a dirt auger. While that maxim is an over simplification of the selection process, it’s a good rule of thumb. Augers have flights to lift the spoils that are loosened by the teeth and a pilot bit that stabilizes the drilling process for a straight hole. Core barrels cut a single track, applying more pressure per tooth, removing rock materials by lifting out the material as individual plugs. In most ground conditions, it’s best to start with an auger tool first, until you reach a point where it is not efficient or it meets refusal to advance because the strata is too hard. At that point, it may be necessary to switch to a core barrel tool for better production. If you must start with a core barrel tool, on a digger derrick, you may need to use a pilot bit to hold the tool straight while starting the hole.
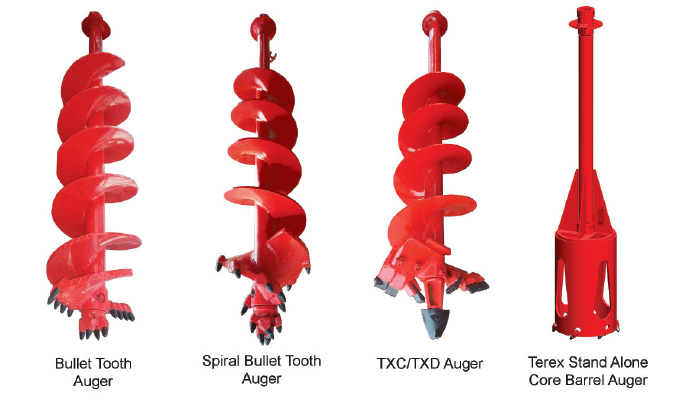
Be sure to match the tool with the ground conditions. Most tool specifications will include a description of the type of applications for which the auger tool or barrel is designed. For example, the Terex TXD Series of digger derrick augers are designed for compacted soil, stiff clay, and soft shale conditions, while the Terex TXCS Series of digger derrick carbide rock augers can tackle medium limestone, sandstone, and frozen materials. For harder material, choose Bullet Tooth Auger (BTA) Series of tools. Core barrels are used when material cannot be effectively drilled with conventional flighted rock auger tools, including conditions such as fractural and non-fractural rock, and non-reinforced and reinforced concrete.
The type of teeth on the tool’s pilot bit is directly related to the application it’s designed to work in. The pilot bit and the flighting teeth should be compatible, with the same strength and cutting characteristics. Other specifications that are important in selecting the tool are auger length, flight length, flight thickness, and flight pitch. Various auger lengths are available to allow operators to fit the tool to the available tool clearance on your specific auger drill device or the digger derrick configuration.
Flight length is the auger’s total spiral length. The longer the flight length, the more material you can lift out of the ground. Long flight length is good for loose or sandy soil. Flight thickness impacts the strength of the tool. The thicker the tool flights, the heavier, so it’s beneficial to choose only what you need in order to maximize payload on the truck and material lifting capacity of the boom. Terex recommends a thicker flight at the bottom of an auger for heavy duty applications.
Flight pitch is the distance between each spiral of the flighting. Too steep of a flight pitch, with loose soil, will allow the material to slide right back into the hole. In that situation, a flatter pitch would be more effective. But a steeper pitch will get the job done more quickly when the material is denser. Terex recommends a steep pitch auger tool for wet, muddy, or sticky clay conditions, as it’s easier to remove the material from the auger once lifted out of the hole.

SWITCH TO CORE BARREL
At any time when the auger tool meets refusal, it’s a good time to switch to a core barrel style instead. By design, a core barrel single track cuts through hard surfaces better than multiple tracks produced by a flighted tool. When drilling through hard rock, such as granite or basalt, slow and easy is the best approach. You’ve got to be patient and let the tool do the work.
In the most extreme conditions, use a core barrel on an auger drill. However, in some hard rock conditions, a digger derrick with the right tool can also get the job done if the hole required is a smaller diameter. Terex recently introduced a Stand Alone Core Barrel for digger derricks, which attaches and stows directly to the boom and fits directly onto the auger drive Kelly bar, eliminating the need for any additional attachments. When a flighted auger will no longer do the job, the new Stand Alone Core Barrel can increase productivity when drilling hard rock, such as limestone material. For applications requiring drilling to begin at ground level, a removable pilot bit can be used to stabilize the Stand Alone Core Barrel in order to start a hole. Once initial penetration is achieved, the pilot bit can be removed. The optional pilot bit is important for achieving a straight starter track because it prevents the core barrel from wandering and shifting out of line.
Some conditions, such as ground water, warrant specialized tools like drill buckets, often called mud buckets. These tools remove fluid/ semi fluid material from the drilled shaft when material does not adhere to auger flighting. Terex offers several styles, including Spin-Bottom and Dump-Bottom. Both are efficient methods for removing wet soil and the selection of one over the other often depends on the preference of the user. Another often-overlooked condition is frozen ground and permafrost, which is very abrasive. In this situation, a bullet tooth spiral rock auger is able to work efficiently.
SAFE, PRODUCTIVE DRILLING TIPS
Once you’ve selected the machine and tool for the job, but before you begin, always know what’s below and above the dig location. In the U.S., “Call before you DIG” by calling 811 can help protect you and others from unintentional contact with existing underground utilities. Canada also has a similar concept, but the phone numbers can vary by province. Also, always inspect the work area for overhead lines to prevent powerline contact and electrocution.
The jobsite inspection should also include inspection of the digger derrick, auger drill and tools you plan to use. Follow manufacturer instructions for daily pre-shift equipment and tool inspections. It’s important to check teeth to make sure they are in good condition. For example, if rock teeth don’t turn freely, they may wear flat on one side decreasing life and efficiency. Also look for wear in the teeth pockets. In addition, if the carbide on a bullet tooth has worn away, it’s time to replace the tooth. Not changing worn teeth can severely damage the tooth pocket, which can be costly to repair. Also check the hard face edges of auger flighting and barrel tools for wear or the diameter of the hole may be affected. Re-hard facing the edges, prevents a reduction in the hole diameter, and can often be done in the field.
Always follow manufacturer instructions for any auger tool repairs. Follow correct tooth installation and removal procedures, using the proper tools. Many tools are designed to make tooth replacement easy, but it can be a dangerous task if not done right. For example, never strike the carbide face with a hammer. Anytime you strike a hardened surface there is risk of metal shattering off, which can cause bodily injury. Finally, remember to grease teeth upon installation. This is very important for maintaining free movement during operation and it makes it easier to remove the teeth when replacing them.
Digger derricks and auger drills use a variety of types of stabilizers—A-frame, out-and-down, and straight down. Regardless of the type of stabilizers or outrigger, always use outrigger pads underneath the stabilizer footing. This prevents one side of the machine from sinking into the ground. When the machine is out of level, it can cause your hole to not be plumb. For auger drills, rely on the level indicator in order to maintain the correct drill angle. For digger derricks, operators must continuously monitor the boom position, to make sure the auger remains vertical by extending or retracting and rotating as needed.
Finally, tailgate safety meetings should include reminders for personnel to stand at least 15 feet away from drilling operations, to be aware of moving parts and open holes, and to wear proper PPE, including gloves, goggles, hard hats, hearing protection, and hi-vis clothing. If work continues around open holes, either cover the holes or wear fall protection and tie off to an approved permanent structure.
CLOSING THOUGHT
Utility crews must make many decisions about the ground conditions when performing drilling operations. Understanding the ground conditions, the condition of the equipment, capabilities of digger derricks, auger drills, the many tool attachments available and following the manufacturer’s instructions makes the job more efficient and can help prevent incidents.
About the author:
Dale Putman has 47 years of experience working for manufacturers of drilling equipment and auger tools. During that time, he has worked with utilities performing drilling operations all over the world. His thorough understanding of the applications and challenges of drilling operations amplifies his ability to serve Terex Utilities customers.
Modern Contractor Solutions, April 2020
Did you enjoy this article?
Subscribe to the FREE Digital Edition of Modern Contractor Solutions magazine.
